
Creating a new MPLAB X project
This tutorial will lead you through the steps required to create the first Introductory Activity programming project for either the CHRP4 or UBMP4 circuit using Microchip’s MPLAB® X IDE.
While creating a project using this type of step-by-step approach takes more time than simply cloning the project from its GitHub repository, having an understanding the steps involved in creating a project will be helpful when you are ready to create your first project for new circuit or future program.
For more information on MPLAB X and how it compares with the cloud-based MPLAB Xpress IDE, or for information about cloning a GitHub project into MPLAB X, refer to our getting started with MPLAB X page.
MPLAB X IDE and MPLAB XC compilers
MPLAB X is a mature desktop IDE used to create and edit programming projects for all varieties of Microchip microcontrollers. In order to compile programs for each specific microcontroller family, MPLAB X needs to be paired with an appropriate MPLAB XC compiler. The mirobo projects on this website are all based on the 8-bit Microchip PIC architecture, and will require the MPLAB XC8 compiler to build their object code.
The MPLAB X IDE and the various MPLAB XC compilers can be run on computers running the Windows, Linux, and macOS operating systems. All of the versions of MPLAB X interoperate, so saved MPLAB X projects can be opened by computers using any supported operating system.
Alternatively, the cloud-based MPLAB Xpress IDE is an option for project development in a web browser on every operating system, and also enables microcontroller programming using Chromebooks.
Step 1 - Download and install MPLAB X and XC8
If this is your first time developing a project with MPLAB X, you will need to download the newest version of both the MPLAB X IDE as well as the MPLAB XC compiler from the Microchip website.
Get the MPLAB X IDE from the MPLAB X developer tools and resources page.
Get the MPLAB XC8 C compiler from the MPLAB XC developer tools and resources page.
Choose the appropriate installation packages for your operating system from Microchip’s web site, and install both applications following Microchip’s instructions. The order they are installed in doesn’t matter, but MPLAB X will have to be re-started if it is running when a new compiler is installed. The default installation and configuration choices will work best for most applications.
If you have an older version of MPLAB X installed, we recommend installing version 6.15 of MPLAB X and version 2.41 of MPLAB XC (to match the versions used for these examples), or newer versions if they are available. New versions of MPLAB X get installed into their own folder and will happily coexist with one or more older versions already installed on your computer. The same is true of MPLAB XC compilers – new versions can be installed alongside existing versions.
When you decide to remove an older version of either MPLAB X or MPLAB XC8, or no longer wish to use them, an uninstaller program is located in each version’s folder on your computer.
Step 2 - Prepare a project folder
Cross-compiling programs (building programs for microcontrollers on a desktop computer) creates a multitude of files. There are the source files, of course, but also project files, log files, debug files, error files, and the compiled object code files. To store and organize all of your MPLAB X projects, and to corral all of the files that MPLAB X generates, create a folder to organize your MPLAB X programming projects in your computer’s filesystem.
One of the first settings that has to be chosen when creating an MPLAB X project is the location of this parent project folder. MPLAB X will create a sub-folder for each new project inside your project folder, helping you to stay organized. You might even consider creating sub-folders for each circuit you plan on programming to further organize your project files.

This UBMP4 folder inside the MPLABX folder will be used to organize future UBMP4 programming projects.
Programming Terms
IDE (Integrated Development Environment) - software used to manage all the files in programming projects, compile programs, and download the programs into microcontrollers.
Source code files - one or more human-written files making up a computer program.
Project - a collection of source code files, IDE configuration files, and output files making up a program.
Compiler - a computer program that converts program source code into processor-specific machine code, or an intermediate machine readable format.
Assembler - a computer program that converts low-level assembly language source code into processor-specific machine code.
Machine code - the processor-specific instructions that make up a program, encoded as binary data in the memory of a computer.
Object code - compiled source code in the form of machine-readable instructions representing all, or just parts, of a program.
Linker - a computer program that combines one or more object code files into a complete program.
Hex file - a file format representing the machine code instructions and their memory locations used by a hardware programmer to write the program into the memory of a microcontroller.
Programmer - a hardware device that can read and write the memory of a microcontroller to write and verify a program’s machine code instructions into its memory.
Bootloader - a software program running in a microcontroller that is capable of writing a user program into the memory of the microcontroller without over-writing itself.
Step 3 - Download the project files
This tutorial will demonstrate how to create and build the Introductory Activity 1 programming project for either the CHRP4 or UBMP4 circuit. Download the archived project files for your circuit below, or obtain the source files for any other project you would like to build in MPLAB X:
Download the CHRP4 Introductory Activity 1 - Input and Output project files for the CHRP4 circuit.
Download the UBMP4 Introductory Activity 1 - Input and Output project files for the UBMP4 circuit.
Un-archive the files, but don’t move them to the folder that you created in the previous step, yet. You will do that in a later step as the final MPLAB X project folder has not been created yet.
The archives for the first introductory activities each contain four source files. Three are source code files having filenames ending with a .c file extension, and one is a header file ending with a .h file extension.

The four source files that make up the UBMP4 introductory project. If you are creating the CHRP4 introductory project, it will contain two files named CHRP4.c and CHRP4.h instead of the UBMP4.c and UBMP4.h files.
Step 4 - Set up a new MPLAB X project
Start MPLAB X. When MPLAB X opens, click the New Project icon – the second one from the left in the toolbar. It looks like a file folder with a plus sign. Or, choose New Project from the File menu.

The next few steps will configure the basic project settings.
When the New Project dialogue box opens, choose Standalone Project from the Microchip Embedded category and click the Next button.

Start typing PIC16F1459 into the Device: box. You can complete the device number, or select PIC16F1459 from the list before completing all of the characters.
Set the Tool option to Simulator, and click Next.

Select None for the Supported Debug Header, and click Next.

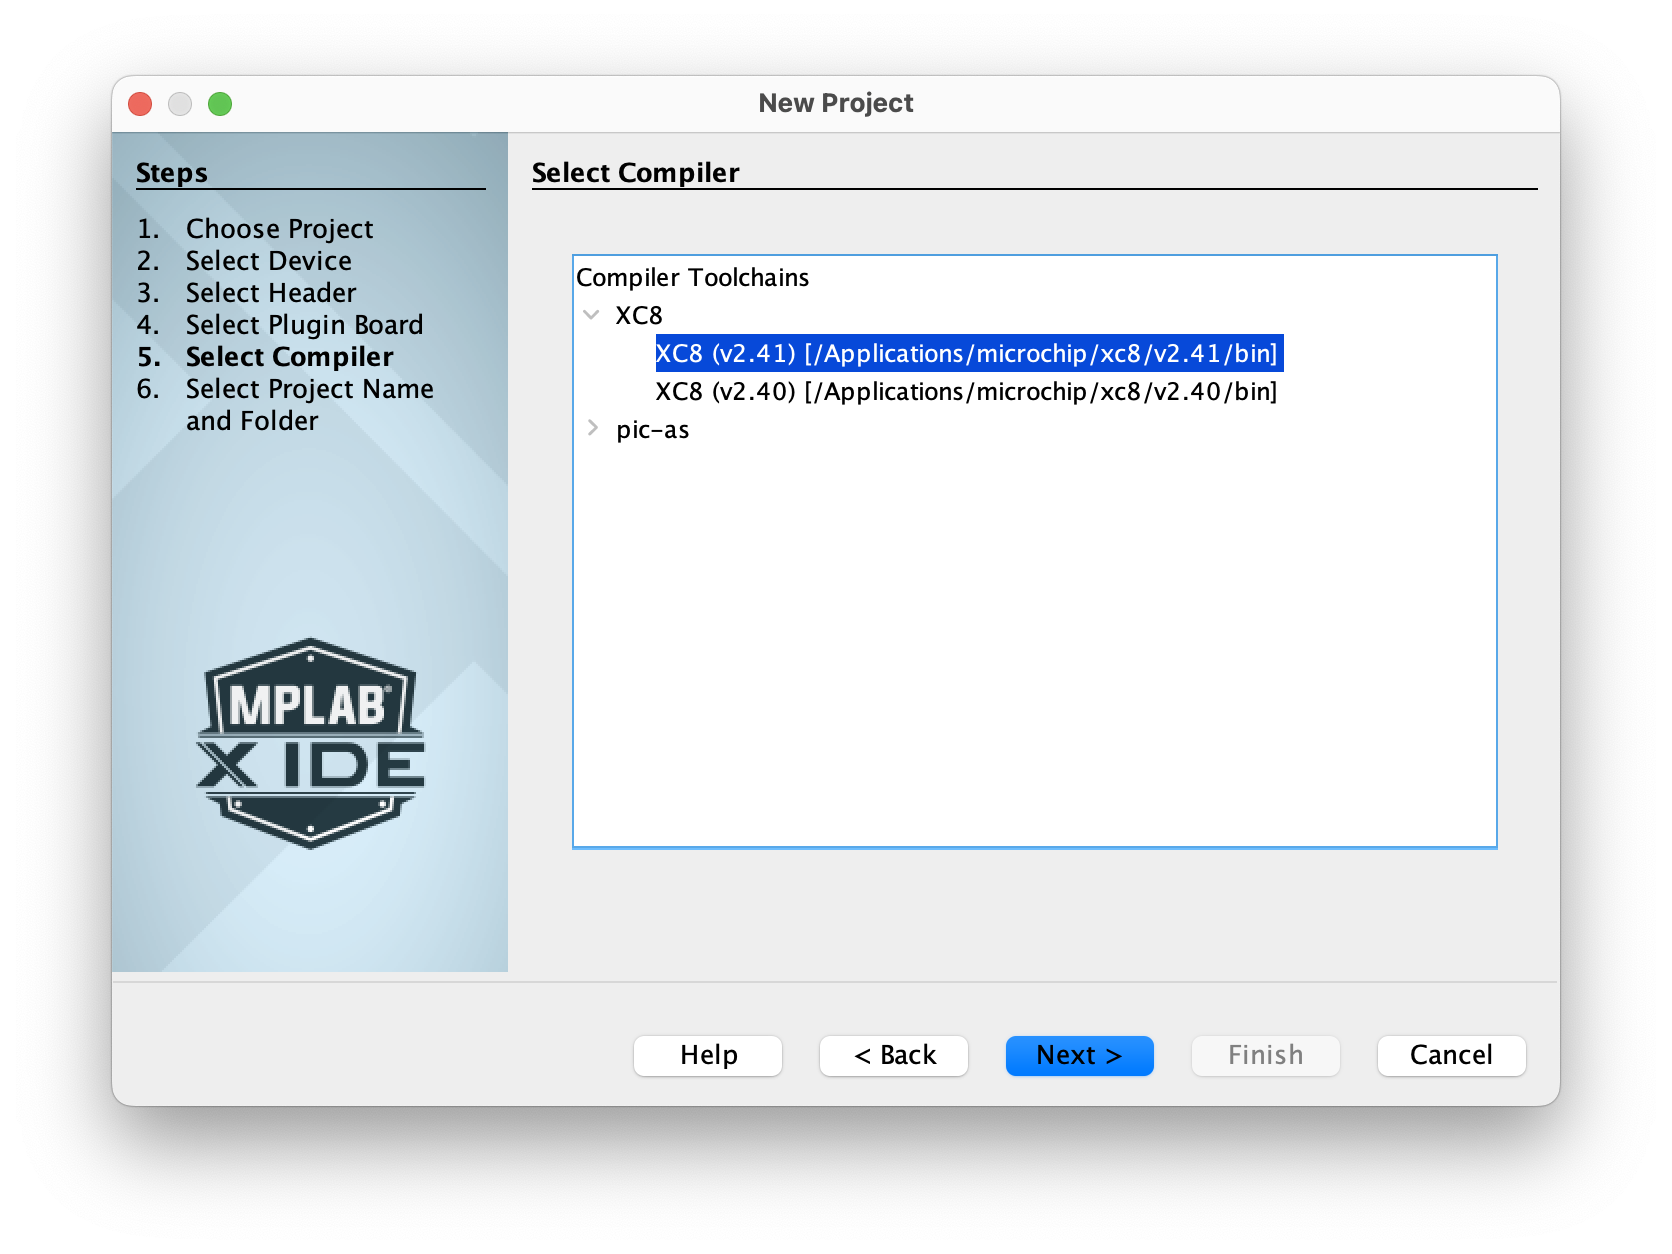
Select the XC8 C compiler – if more than one compiler is installed, choose the newest from the top of the list. If no compilers are visible, you will need to download and install the latest version of the MPLAB XC8 compiler from the Microchip Technology website, and then re-start MPLAB X. (As a side-note, pic-as is the assembler that is included with the XC8 compiler.)
After selecting the compiler, the Project Name and Folder dialogue opens. Our recommendation is to set the project location first. Click the Browse button and navigate to the project folder that you created to organize all of your MPLAB X projects in step 2, above.

This project will be stored in the UBMP4 sub-folder of the MPLABX folder in the user’s folder.
After selecting the project location, give your project a name. This example spells out the full name, but you could use a shorter option such as Intro1 instead. Click the Finish button after choosing a name to complete the project setup.

After finishing the project setup, the Projects browser tab should be open at the top left of the screen, with the Dashboard panel open below it. If not, choosing Reset Windows from the Window menu will arrange the windows and panels as shown below. The Dashboard panel shows some of the device and compiler settings made earlier during the project setup, and some of these project properties will have to be modified later.

Step 5 - Import the project files
Navigate to the MPLAB project folder you created earlier, and open the folder for the new project that was started. The project folder will contain a Makefile and some additional folders.

Copy the source files that you downloaded from the project archive in step 3 into the MPLAB X project folder.

The UBMP4 header and source files have to be copied into the same folder as the project Makefile. The next step is to add the files into the project in MPLAB X.
Return to MPLAB X and click on the Header Files item in the Projects organizer tab to highlight it. Right-click on Header Files to open a context menu and select Add Existing Item… from the menu items.

Navigate to your project folder and select the header file (ending in the .h file extension) to be added to your project.

If the header file is not visible in the Projects tab at the left of the MPLAB X window after this step, either double click the Header Files item, or click the arrow to its left to expand the header files section of the project, revealing the added header file.
Next, select the Source Files item to highlight it. Right click Source Files and choose Add Existing Item… from the context menu items to add the remaining program files.

Select the three program source code files (ending with the .c file extension) and add them to your project. Multi-select the files by pressing and holding the CTRL key (Windows) or Command key (macOS) to add all three files at once, or select and add each file individually.

Open both the Header Files and Source Files items in the Projects organizer to verify that all four of the project files have been added. Then, double-click the Intro-1-Input-Output.c source file to open it in a tab of the the code editor window on the right.

Note: If you are starting a new programming project for your same circuit from scratch, you can copy the existing source and header files from another project into your new project folder to get you started. Alternatively, select the either of the Header Files or Source Files item in the Projects tab, and click the New File icon (the left-most icon in the toolbar) to create a new, blank file. Choose the C category from the dialogue box that opens, and then create a source code file, main file, or header file and follow the prompts to name the file. By clicking the Header Files or Source Files items first, before creating the new file, the new file is created and organized within this part of the project.
Step 6 - Linker memory configuration
The next steps configure the linker settings in MPLAB Xpress to reserve some of the program memory inside the PIC16F1459 microcontroller for the USB µC bootloader. If your project does not use a bootloader, proceed to the next step to build the project.
The required bootloader settings are listed as TODO items (short for ‘to do’, or still to be done) in the Intro-1-Input-Output.c source code file. The ROM ranges setting on the first line is challenging to remember, so highlight the contents within the single quote marks and copy them. This will make it easy to paste these values into the project’s Linker settings.
To get to the Linker settings, start by clicking on the Project Properties icon in the project Dashboard panel – it looks like a wrench with a bolt and nut icon, and is the top-most icon at the left of the project Dashboard.

After the Project Properties window for the project opens, you will see a number of project configuration categories in the left panel, and the settings related to each category on the right.

From the Categories: panel on the left, choose the XC8 Linker settings item.

From the Option categories: drop down at the top of the window, select Memory model.

Click in the ROM ranges box to place the cursor in the box, and paste the settings copied from the source code file – the same settings are reproduced inside the single quotes here: ‘default,-0-7FF’. These settings reserve the memory between addresses 0-7FF (hexadecimal) in the microcontroller for the bootloader.
Click the Apply button to save the changes without exiting the Project Properties settings.

From the Option categories: drop down at the top of the window, select Additional options.
Click in the Codeoffset box and enter the value 800. This will be the starting memory address of the program, located right above the memory reserved for the bootloader. Click OK to save the settings.

Step 7 - Build the project
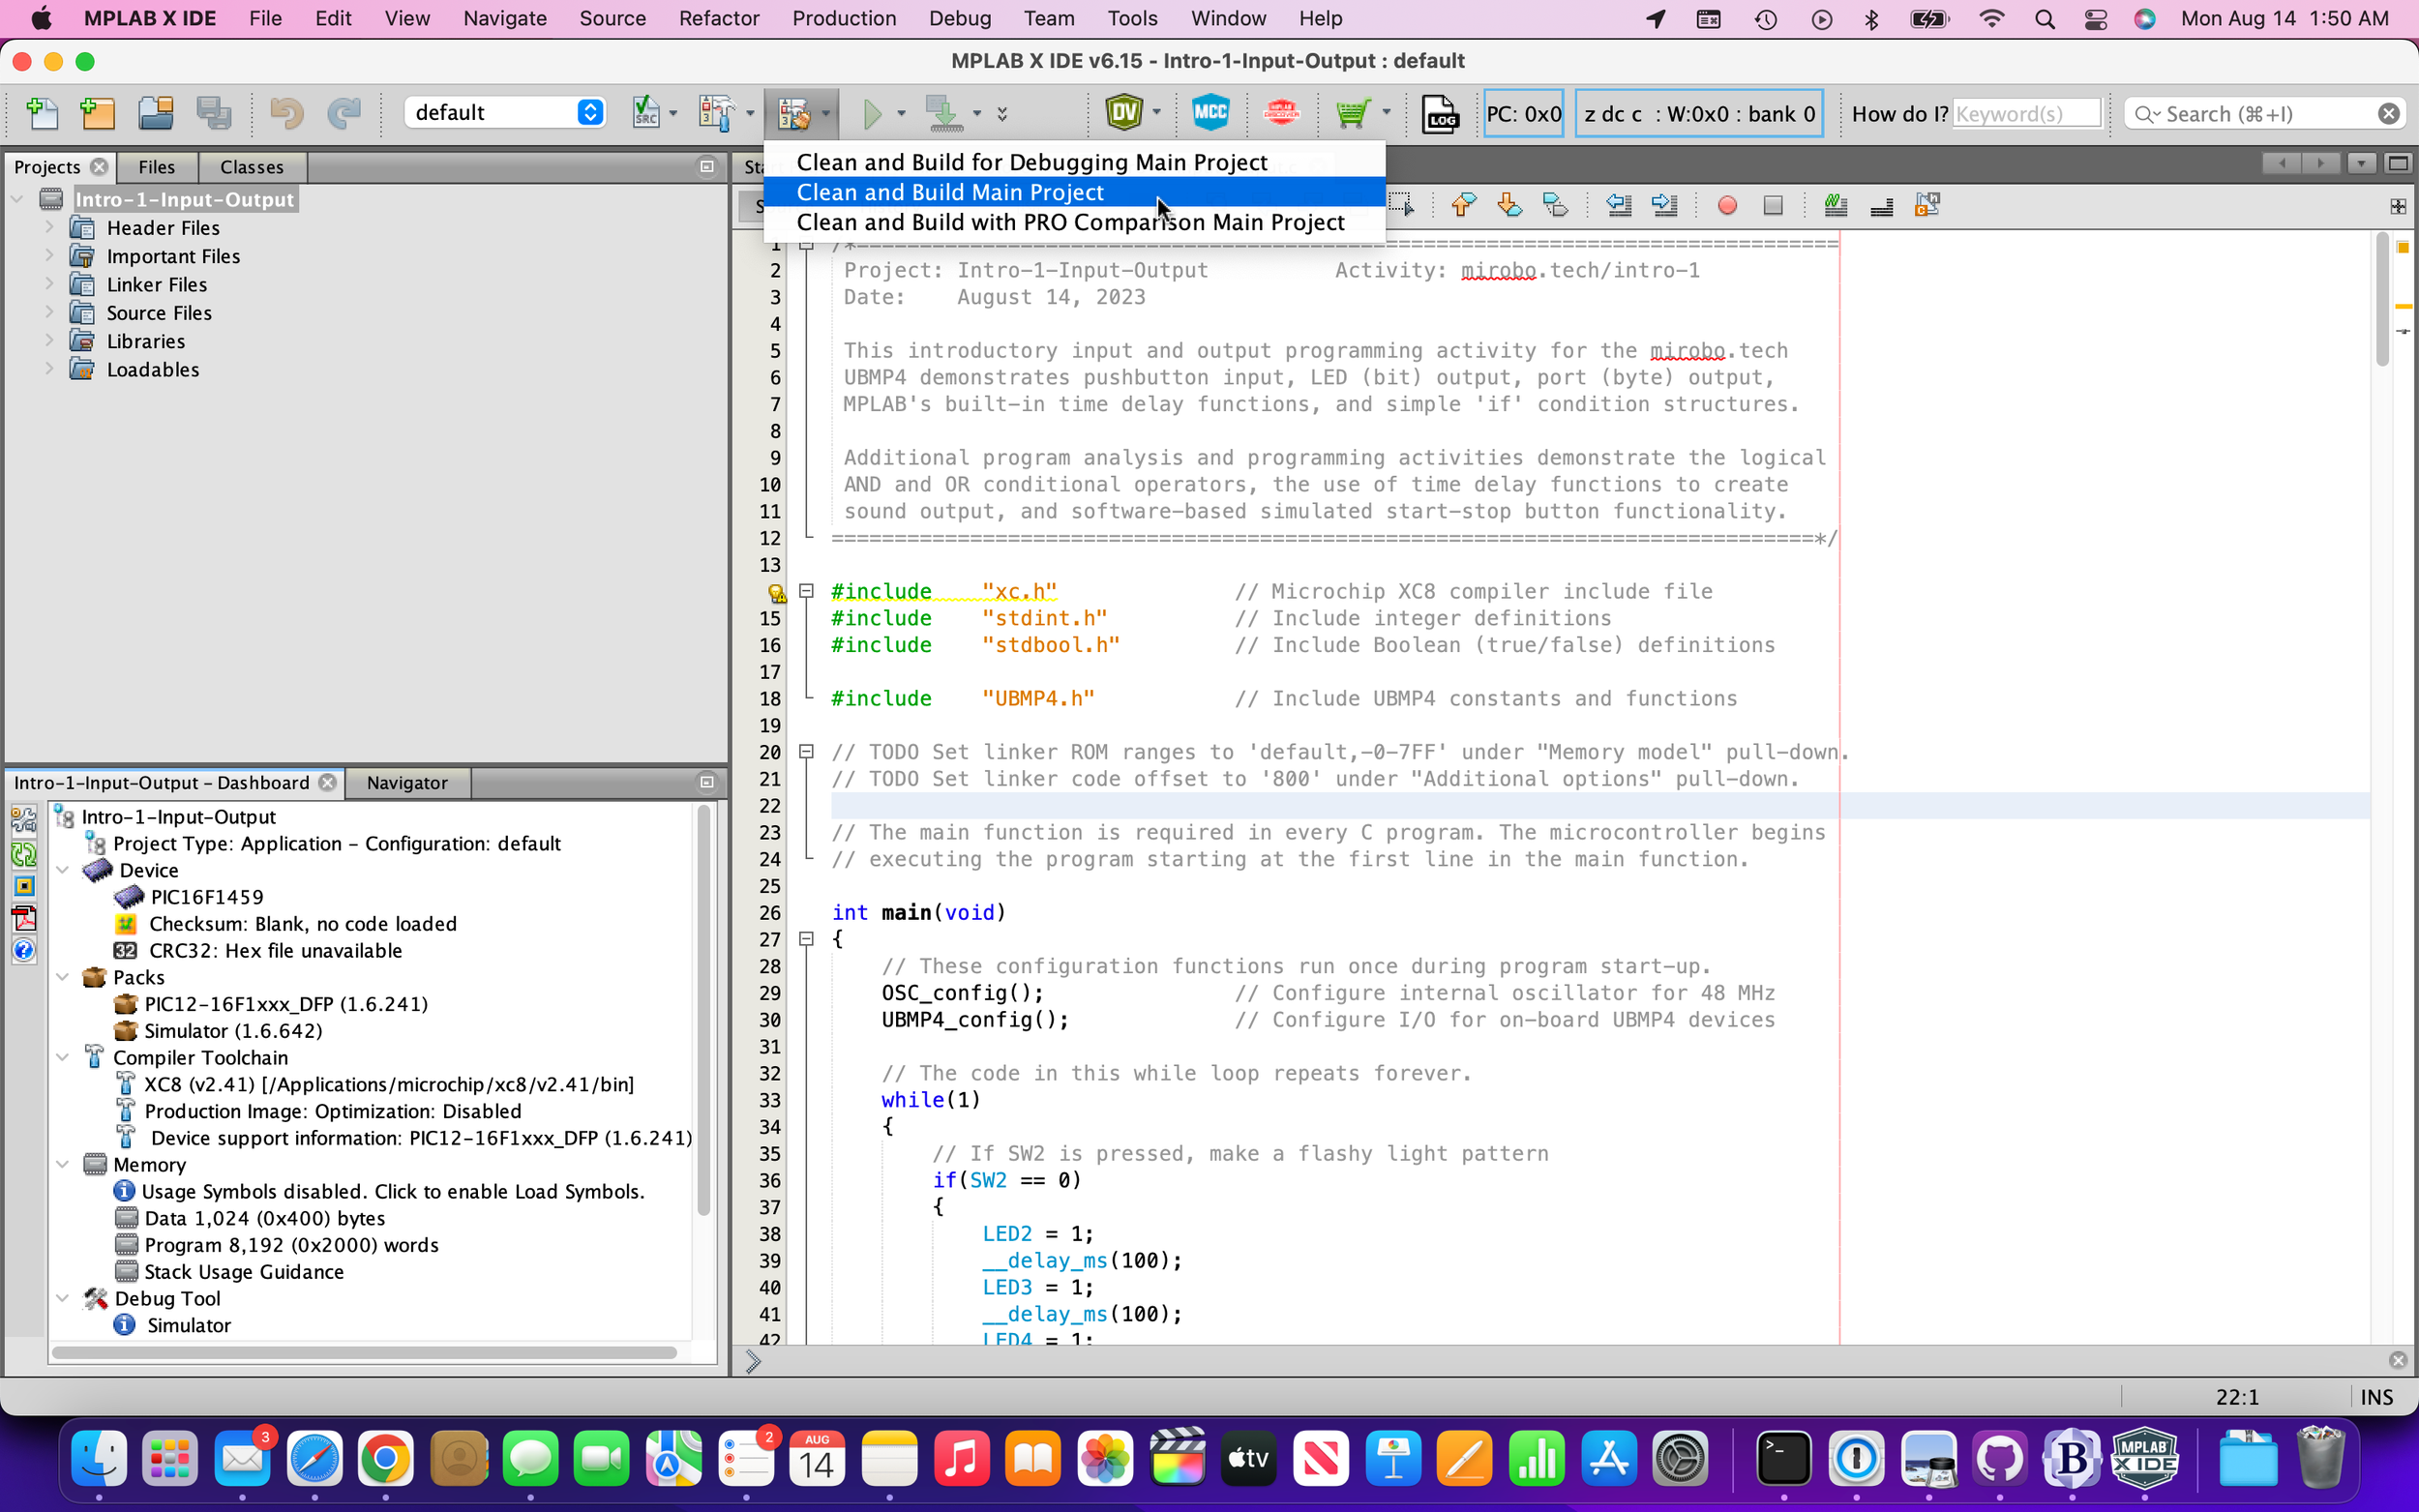
Compiling the program is referred to as building the project. Click the downward-facing arrow beside the Clean and Build icon (the hammer and broom) in the toolbar, and select the Clean and Build Main Project option to erase any older project build files and compile the current program.
Bonus tip: any of the project’s files that have been edited will be saved in their current state when the project is built, so you don’t have to worry about individually saving the updated files in each of the tabs.
When compilation starts, the Output window below the code editor opens to show the progress of the build and the results of the build operation.

If the build process is successful, the program is ready to be downloaded to your circuit.
If the build fails, check any of the source code files that you edited for errors and, after fixing any errors that you find, try to build the file again. Common sources of errors after editing the Intro-1-Input-Output.c file are missing characters at the start of the first comment block, missing characters at the end of the final comment block, missing semi-colons ‘;’ at the end of C statements, or mis-matched curly-braces { } in the program.
Step 8 - Program your circuit
There are a number of different ways circuits can be programmed, but since this tutorial builds the introductory activity for the CHRP4 or UBMP4 circuits this example will focus on the using the USB µC bootloader for programming. (Get more information about uploading programs using a bootloader.)
Locate the object code
First, locate the compiled object code file. Navigate to your MPLAB project folder.

Additional project folders have been created during the build process. Open the dist (distribution) folder.

The default folder is created by MPLAB for the default configuration of a build – MPLAB X can support multiple, different build configurations for each project. Some versions of MPLAB X create a folder named free instead of default.
Open the folder inside the default folder to reveal the production folder nested inside it.
Open the production folder to see all of the files created during the build process. Many of these files are created by MPLAB to assist during debugging, and the .hex file is the executable program that that you will drag and drop onto your device.

Connect your circuit and press SW1
Connect your CHRP4 or UBMP4 to your computer’s USB port. The next step will only work if the USB µC bootloader is pre-installed in the PIC16F1459 microcontroller – it comes pre-installed in the microcontrollers included in CHRP4 and UBMP4 kits.
Press and release pushbutton SW1, beside the USB Type-C connector on your device. A drive named PIC16F1459 will mount in your computer’s filesystem.
Drag and drop your program into the circuit
Drag and drop the program .hex file to the PIC16F1459 drive to download the program into the microcontroller on board your circuit using the bootloader.

Downloading this program through the bootloader takes less than a second, and the PIC16F1459 drive will be automatically ejected from your computer. That’s it! Your program is now running in your device.
You should now be able to create an MPLAB X project for any of the activities on this site, and the same basic steps apply to create almost any type of microcontroller project for other Microchip microcontrollers.
MPLAB® is a registered trademark of Microchip Technology Inc. in the USA and other countries.